I get so much satisfaction from publishing patterns. Every time I publish one, I feel a surge of motivation and I tell myself that I need to set firm goals and get more done. My good intentions are usually waylaid by general life stuff, so I guess I need to learn to coast on the high I feel when I actually do publish.
Do you ever wonder what goes on behind the scenes of small craft businesses? I do all the time. When I see a particularly great photo, I wonder how many shots it took to get that great one. How many different set-ups did they try? Where did they find that model? We in the crafting world have all had to become our own photographers and marketers which I always think is the hardest part. I daydream about a magical intern who will do all my pictures and listings for me so I can spend all of my time designing. Alas, it is all on me and not just me I fear. When you are the offspring of a pattern designer, chances are about 100% that you will get roped into helping out.
I have two son's, so they manage to escape quite a bit by virtue of being the wrong gender for much of what I make. However, I am not shy about enlisting them for help. I have to giggle when I think that part of their childhood memories will be some of the weird things I have asked them to do for Wind Rose Fiber Studio. For instance, just yesterday, I had my 19 year old son hold a life-like baby in his arms so I could get a picture of my Hooded Baby Blanket for the pattern. The poor guy had to sit there and play daddy with a baby doll and he was such a good sport. I love my kids!
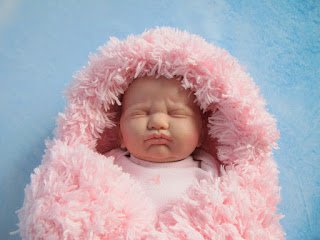
I guess I should share a bit about the pattern while I'm here. I wanted to make something super soft and fluffy so people could use it as a prop for precious new baby pictures. At the same time, I wanted it to be practical. After toying with a few ideas, I remembered my kids old hooded bath towels and how cozy they were. It was fun to wrap them up after a bath from head to toe and let them snuggle. I decided to make the same kind of thing only as a furry blanket. You can burrito up a baby with hood included or just use it as a nursery blanket. While the pattern is not difficult, it can be a challenge to work with fur yarn. You need to be able to feel for where the stitches go, but as long as you are comfortable with a crochet hook, the Hooded Baby Blanket should be a quick and easy pattern.
I was just reading my last blog post from September of 2018. That's right, September! Blimey it's been a long time!!!
At least let me follow up my last ancient post. Since the fall of last year, I have managed to get a couple projects done. The Daydreamer Dolman Sweater is my brand new pattern that has been months in the making. I really wanted to design something to showcase all of the fun, cake style yarns on the market. This was made using Caron Latte Cakes and I just love how the colors present themselves in cool, geometric patterns. Of course you could go solid or design your own. I made
up this second one with short sleeves using Yarn Bee's Fur-Ever Style and trimmed it out with a pretty blue from my stash. This one is lighter weight and a nice layer to throw on over a tank. It's worked in a free size for all of us fans of loose, comfy clothes.
So that's my big new pattern, but in my last post I was talking about my All Wrapped Up in Circles & Squares Applique and how I was working on project using this motif. I ended up assembling two of the 10" squares and designing a handbag. All of the details can be found on Instagram by searching #circlesandsquaresbag You can find me on Insta @jennofwindrose and here is what the finished project looks like...
Cute, huh?
I guess I have one last share before I call it a night. I recently found a source for really nice quality Recycled Sari Silk Sliver. It is free of little threads and bits that are commonly found in recycled sari silk so its pure pleasure to spin. If you love all of the gorgeous and somewhat random colors that can be found in recycled sari silk, you will go crazy for this fiber. Oops, can't forget the pic!
Okay, I am going to call this Wednesday done. Hope life is treating you well!!
All Wrapped Up in Circles and Squares is the name of my latest pattern, but it also feels a bit like my mental state, at least the "all wrapped up" part. With one child in grad school and the other starting under grad, I have achieved a level-up of sorts. I'm greeting my newfound autonomy with over-eagerness, jumping into all of the projects that I have been promising myself I would do if I had a little more time. I have wrapped myself up in all of them.
Of these myriad projects, was the goal to design and publish more patterns. For starters, I had an idea to design a mandala, only to find out that they have been all the rage for at least a couple years. How did I get so out of touch? Oh well, I designed my mandala anyway. I call this the Tulip Mandala. There are subtle little flowers worked into the pattern.
After the mandala, I decided I wanted to create a lotus flower in profile. You see plenty of crocheted lotus flowers, but they are typically an overhead view. They start at the center and work their way out to the petals. Crocheting in the round lends itself to flowers made this way, but I have always loved that iconic lotus in profile, so I created an appliqué to be used as a centerpiece or embellishment. Here's my Lotus Flower Appliqué.
I guess after the lotus flower, I must have been on an applique kick, because that's when I designed my latest motif, All Wrapped Up in Circles and Squares. The inspiration for this design came from some old fashioned yarn play. I was stuck on a plane, so I pull out a hook and a skein of yarn (never leave home without the essentials) and just started to noodle or doodle or whatever it is we yarn people do. I ended up with a circle where the outer ring was a fully wrapped round of stitches. It was overlay and underlay. It had texture and what I think of as a stained glass effect, colors peeking out between lines. I did not know how I would use it, but I knew I had to turn it into something.

When I sat down to work with my new shape in earnest, I thought, "What if the circle becomes a square?" I turned my wrapped circle into a square and then I turned it back into another wrapped circle, and then again a square. It was a challenge to write, a brain teaser of sorts. It's easy to crochet in the round and it's easy to make a square, but going back and forth was something new, at least for me. In the end, I had a nice, big 10" square.
Currently, I'm working on designs utilizing the All Wrapped Up in Circles and Squares motif. I'm giving the first tutorial away CAL style on Instagram. You can find all of the posts by searching #circlesandsquaresbag and you can find me on Insta @jennofwindrose
Materials:
Crochet Hook Size J
Yarn - two colors of worsted weight yarn - Sample made with Patons Classic Wool, color Paprika [4] and Sensations Angel Hair, color 4729 [5]
Scissors, large eye needle, stitch marker (optional)
Note 1: yarn (A) will be the color with which you begin your beanie. In this case it is the Paprika (orange). The brim can be worked in either color.
Note 2: This pattern is worked in the round.
Stitches: You will be using the following stitches - chain stitch (ch), slip stitch (sl st), single crochet (sc) and changing colors. (∆) will symbolize changing colors throughout. I will use
this symbol when you come to the last stitch of a color. You will start
the stitch in the same color, but on the last yarn over, you will
replace your yarn with the other color and pull up your loop. *Repeat
instructions between asterisks* the number of times indicated. Crochet 'N' More has a useful stitch guide.
Beginning at the Crown:
Begin with color (A). The center of the crown should not have a hole in the middle so we'll begin with a magic ring also known as a magic circle. Wrap the tail end of your yarn, clockwise, from back to front around the index and middle fingers of the hand with which you hold your yarn. There should be 2 loops of yarn around your fingers. Insert your hook under the front loop and hook the back loop. Draw it under the front loop. Yarn over and pull through the loop on your hook. Pull the tail of your yarn to tighten the circle, but not all the way.
Sizing - Work the following rows until the diameter is the correct width for your desired hat size. Remember, circumference = 3.14 x diameter. For a 21 inch hat, the diameter should be approximately 6.5 inches. If you want a 22 inch hat, then stop when your crown has a diameter (width) of 7 inches. For a 23 inch hat, the diameter should be approximately 7.5 inches. I'm rounding these numbers, so if you want to do the math, just divide the desired size of your finished hat by 3.14 (π). For my sample hat, which is made to fit a 22" head, I worked Rows 1-12. When your diameter has reached the desired width, move on to the Body or Length of the Beanie.
 Row 1: (A) work 4 sc in the circle, sc in the circle (∆ B), sc in the circle (equals 6 sts) Pull the tail end of the yarn to close the beginning circle the rest of the way.
Row 2: 2 sc in next 3 sts, sc in next st, sc in same st (∆ A), 2 sc in next 2 sts. (equals 12 sts)
Row 3: *1 sc in next st, 2 sc in next st* 3 times, sc in next st (∆ B), 2 sc in next st, *1 sc in next st, 2 sc in next st* 2 times (equals 18 sts)
Row 4: *sc in next 2 sts, 2 sc in next st* 2 times, sc in next 2 sts, sc in next st (∆ A), sc in same st, *sc in next 2 sts, 2 sc in next st* 3 times. (equals 24 sts)
Row 5: *sc in next 3 sts, 2 sc in next st* 2 times, sc in next st, sc in next st (∆ B), sc in next st, 2 sc in next st, *sc in next 3 sts, 2 sc in next st* 3 times (equals 30 sts)
Row 6: *sc in next 4 sts, 2 sc in next st* 2 times, sc in next st (∆ A), sc in next 3 sts, 2 sc in next st, *sc in next 4 sts, 2 sc in next st* 3 times. (equals 36 sts)
Row 7: *sc in next 5 sts, 2 sc in next st* 1 time, sc in next 5 sts, sc in next st (∆ B), sc in same st, *sc in next 5 sts, 2 sc in next st* 4 times. (equals 42 sts)
Row 8: *sc in next 6 sts, 2 sc in next st* 1 time, sc in next 4 sts, sc in next st (∆ A), sc in next st, 2 sc in next st, *sc in next 6 sts, 2 sc in next st* 4 times. (equals 48 sts)
Row 9: *sc in next 7 sts, 2 sc in next st* 1 time, sc in next 3 sts, sc in next st (∆ B), sc in next 3 sts, 2 sc in next st, *sc in next 7 sts, 2 sc in next st* 4 times. (equals 54 sts)
Row 10: sc in next 11 sts, sc in next st (∆ A), sc in next 42 sts. (equals 54 sts)
Row 11: *sc in next 8 sts, 2 sc in next st* 1 time, sc in next st, sc in next st (∆ B), sc in next 6 sts, 2 sc in next st, *sc in next 8 sts, 2 sc in next st* 4 times. (equals 60 sts)
Row 12: *sc in next 9 sts, 2 sc in next st* 1 time, sc in
next st, sc in next st (∆ A), sc in next 8 sts, 2 sc in next st, *sc in next 9 sts, 2 sc in next st* 4 times. (equals 66 sts)
Row 13: sc in next 10 sts, sc in next st, sc in same st (∆ B), * 1 time, sc in
next st, sc in next st (∆ A), *sc in next 10 sts, 2 sc in next st* 5 times. (equals 72 sts)
Body or Length of Beanie
sc in each st around. ∆ colors in second to last st of each opposing color row. For instance, if you begin crocheting in color (B). The sts you are working into are color (A). When there are only two color (A) sts left, sc in next st (∆ A) and then continue working around in (A). Follow the pattern in this way until you reach your desired length minus 1 inch for the brim. (I recommend 7.75 to 8 inches from the top of the crown.) Sample has a total of 29 rows before the brim.
 Decide which color you would like to use for the brim. On the last row of the body, you should change to this color. The remainder of the hat will be worked in the brim color, so the other yarn can be finished off leaving enough length to weave in the loose end.
Brim
(use stitch marker if desired)
Rows 1-4: sc in each st around.
Row 5: sc to last st, sl st in last st, ch 1 turn.
Row 6: Skip first st (the sl st from previous row), sc around, sc in ch 1 space.
Rows 7-13: sc in each st around.
Finishing
Sl st into next st, finish off. Fold up last 7 rows to form brim. Weave in all loose ends.
To add a scalloped trim and a flower to the brim, please visit this related post: Baby Girl Beanie


