I get so much satisfaction from publishing patterns. Every time I publish one, I feel a surge of motivation and I tell myself that I need to set firm goals and get more done. My good intentions are usually waylaid by general life stuff, so I guess I need to learn to coast on the high I feel when I actually do publish.
Do you ever wonder what goes on behind the scenes of small craft businesses? I do all the time. When I see a particularly great photo, I wonder how many shots it took to get that great one. How many different set-ups did they try? Where did they find that model? We in the crafting world have all had to become our own photographers and marketers which I always think is the hardest part. I daydream about a magical intern who will do all my pictures and listings for me so I can spend all of my time designing. Alas, it is all on me and not just me I fear. When you are the offspring of a pattern designer, chances are about 100% that you will get roped into helping out.
I have two son's, so they manage to escape quite a bit by virtue of being the wrong gender for much of what I make. However, I am not shy about enlisting them for help. I have to giggle when I think that part of their childhood memories will be some of the weird things I have asked them to do for Wind Rose Fiber Studio. For instance, just yesterday, I had my 19 year old son hold a life-like baby in his arms so I could get a picture of my Hooded Baby Blanket for the pattern. The poor guy had to sit there and play daddy with a baby doll and he was such a good sport. I love my kids!
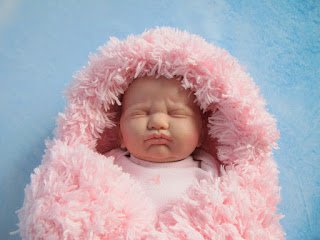
I guess I should share a bit about the pattern while I'm here. I wanted to make something super soft and fluffy so people could use it as a prop for precious new baby pictures. At the same time, I wanted it to be practical. After toying with a few ideas, I remembered my kids old hooded bath towels and how cozy they were. It was fun to wrap them up after a bath from head to toe and let them snuggle. I decided to make the same kind of thing only as a furry blanket. You can burrito up a baby with hood included or just use it as a nursery blanket. While the pattern is not difficult, it can be a challenge to work with fur yarn. You need to be able to feel for where the stitches go, but as long as you are comfortable with a crochet hook, the Hooded Baby Blanket should be a quick and easy pattern.
Showing posts with label Crochet For Baby. Show all posts
Monday, May 20, 2019
Thursday, April 18, 2019
There Is a Better Way, But I'm Doing it This Way Anyway
There is a better way to do this thing I'm doing, but I'm going to go ahead and do it this other way anyway. This sounds crazy and yet with almost every design I undertake, I find myself thinking this kind of thought. It's different from second-guessing or some sort of crisis of confidence, but rather my brain telling me that there is another way of doing the thing I'm doing that would be even better. I will ignore this intelligence and continue on, very often wasting some of my own precious time as well as yarn which I would argue is also precious.
Case in point, my current project is a baby blanket for my nephew's first. My idea is to take a classic doily pattern and make it up in a soft, baby yarn, modifying it just a little to take out some of the larger spacing in the design so that it would serve well as a blanket. The idea is sound, even kind of fun and appropriate for my vintage loving nephew and his wife, but as I work up the blanket, I know it would represent better in a solid yarn and better still in one with a less fluffy texture. Yet here I am, ignoring my own reasoning and working through with my initial yarn purchase. The best thing you can say about this variegated, furry yarn is that the colors will be appealing to the indented recipients and it has an impressionist air which will probably even present the suggestion of lace when complete. Even so, I know deep down that I will end up crocheting the whole piece over again and this will become something taking up space in my studio or at best, donated to a charity which will have no idea what it is supposed to be.
Why do I do this?
Do I want to prove myself wrong?
Is it because I can't abandon a project once I've begun?
Will writing this phenomena down create personal change?
Honestly, I think this is just a shout into the void, an existential "why?" and one of many I have about myself and my creative brain. Perhaps I'm just wondering if anyone can relate.
I'll come back and share my finished baby blanket, both of them.
Case in point, my current project is a baby blanket for my nephew's first. My idea is to take a classic doily pattern and make it up in a soft, baby yarn, modifying it just a little to take out some of the larger spacing in the design so that it would serve well as a blanket. The idea is sound, even kind of fun and appropriate for my vintage loving nephew and his wife, but as I work up the blanket, I know it would represent better in a solid yarn and better still in one with a less fluffy texture. Yet here I am, ignoring my own reasoning and working through with my initial yarn purchase. The best thing you can say about this variegated, furry yarn is that the colors will be appealing to the indented recipients and it has an impressionist air which will probably even present the suggestion of lace when complete. Even so, I know deep down that I will end up crocheting the whole piece over again and this will become something taking up space in my studio or at best, donated to a charity which will have no idea what it is supposed to be.
Why do I do this?
Do I want to prove myself wrong?
Is it because I can't abandon a project once I've begun?
Will writing this phenomena down create personal change?
Honestly, I think this is just a shout into the void, an existential "why?" and one of many I have about myself and my creative brain. Perhaps I'm just wondering if anyone can relate.
I'll come back and share my finished baby blanket, both of them.
Friday, February 3, 2012
Hat Sizing
I've been talking about hats a lot lately, so I thought I'd share this handy hat sizing list. Even for those of us with kids, sometimes it's hard to remember the average head circumference of a 3 year old.
This list leaves out adults. 21"-23" or 53.5 to 58.5cm is pretty typical. 21" is usually an adult small, 22" a medium, which leaves 23" as a large hat size. This is the kind of information that's nice to keep around when hat making is the order of the day!
*Info for this post comes from Little Lids.
This list leaves out adults. 21"-23" or 53.5 to 58.5cm is pretty typical. 21" is usually an adult small, 22" a medium, which leaves 23" as a large hat size. This is the kind of information that's nice to keep around when hat making is the order of the day!
*Info for this post comes from Little Lids.
Baby Girl Beanie
I made another beanie for Craft Hope last night. This one is sized for a baby girl. I thought it might be nice to add a scalloped trim for an extra touch. If you are making the Spiral Beanie, and you would like to add a trim like this one, all I did was alter the last row of the brim as follows:
(sl st, skip st, 3 dc in next st, skip st) around
This gives you a cute little scalloped edge. I also wanted to make a flower for my brim. I was using bulky yarn, so I knew I needed a very simple and flat flower or it would overwhelm the whole hat. Here's how I made my
Six Petal Flower
ch 2
Row 1: 6 sc in second ch from hook, join with sl st to first sc
Row 2: ch 2, dc, ch 2, sl st into same st, *sl st into next st, ch 2, dc, ch 2, sl st into same st* around, sl st into 1st sc and finish off. Use tail ends to sew onto hat.
I hope you enjoy these little embellishments to The Spiral Beanie Pattern!
(sl st, skip st, 3 dc in next st, skip st) around
This gives you a cute little scalloped edge. I also wanted to make a flower for my brim. I was using bulky yarn, so I knew I needed a very simple and flat flower or it would overwhelm the whole hat. Here's how I made my
Six Petal Flower
ch 2
Row 1: 6 sc in second ch from hook, join with sl st to first sc
Row 2: ch 2, dc, ch 2, sl st into same st, *sl st into next st, ch 2, dc, ch 2, sl st into same st* around, sl st into 1st sc and finish off. Use tail ends to sew onto hat.
I hope you enjoy these little embellishments to The Spiral Beanie Pattern!
Tuesday, January 24, 2012
A Beanie For Craft Hope
Yesterday Craft Hope announced Project 16: The Littlest Warriors. This time we'll be crafting for kids fighting cancer. Craft Hope is collecting beanie hats for babies through teens and bags for the kids to take to the hospital. You can even fill the bags with crayons, coloring or activity books and anything else the kids might like.
I couldn't wait to get started, so last night I got to work on a larger version of my Spiral Baby Beanie. I've always liked this hat and I knew it wouldn't be hard to enlarge the size. I need another day or two, but I'll be posting a free pattern for this beanie in youth to adult sizes.
For this particular hat, I picked colors that I thought would look cute on a little boy, but half the fun is making them in different colors every time. You can get creative with embellishments too. On my Crochet Patterns Page you'll find a couple free flower patterns and a little leaf. You could also buy sew-on decals for boys and girls at most craft or fabric stores. Novelty yarns can also take this beanie to the next level. Imagine a fur trim or a nice bouclé.
I like to get the kids involved in these projects too, so I'll be designing an easy sew fleece hat or something that we can do together. My boys just don't want to learn to crochet. Can you imagine that?
Sunday, August 21, 2011
Shop!
Yesterday I was working on my Tunisian crochet project when I got to thinking. I really like making things, but my handmade items tend to get lost among all the roving in my shop. The truth is, I do focus on selling fibers in my Etsy store and that's my intention. Still, I have a studio full of designs that need a good home.
Then it occurred to me that I already link to the patterns I sell here on my blog. You can go to the Crochet Patterns page and not only find free patterns, but the ones for sale as well, so why not have a shopping page?
I already have my handmade accessories available for purchase in my Etsy and ArtFire stores, so I've created a new page that is simply called Shop. It's a gallery of pictures so you can browse through a selection of my favorites. If you see something that interests you, like this cute Autumn Baby Beanie for instance, you can just click on that photo. That click will take you directly to the product listing where you can view more images and all of the important details.
So far I have 21 handmade accessories available on my Shop page. Over the next couple of weeks, I'll be working to add to that list. If you love handmade and giving handmade gifts, or even if you just like to window shop, I hope you will enjoy this new feature here on the Wind Rose Fiber Studio blog.
Friday, July 15, 2011
A Baby Cozy by Cheryl
A couple years ago, I decided to start giving away some of my crochet patterns here on my blog. Several of my free patterns read more like photo tutorials and that's because they were presented as crochet-alongs. Those pattern posts are some of the most labor intensive I've done, but also the most gratifying. Not only did I have fellow crocheters joining in as I wrote each part, but to this day, they are the most visited pages on this site.
Every once in a while, I get a special treat and someone will share their project with me. That happened a couple weeks ago when I got an email from Cheryl. She's been enjoying The Baby Cozy Pattern and has even started putting her own spin on it. This is one of her creations in pink. She added the stripes and the matching hat. What a sweet gift this will make for some lucky baby!
I want to thank Cheryl for sharing her project with me and allowing me to share it with you. I always hope that people will use my patterns as a jumping off point for their own ideas. Perhaps Cheryl's stripes will inspire even more variations on The Baby Cozy. Thanks Cheryl!
Wednesday, March 17, 2010
A Present for Aria

I just had to take a little picture of my gift before I pack it all up. I'm getting ready to see my niece for the first time since February 2009. I can't believe a whole year has gone by and now she's walking and saying words. I just can't wait to see her!
I also can't resist bringing a gift along from Aunti Jenn. I've been planning to make Aria one of the 1885 Baby's Bibs, but a bib isn't a very fun gift, so I decided to make a little set. She should be fast approaching the age where it's fun to play "tea". I found two matching bowls and spoons and then I made two bibs, one for Aria and one for a pretend friend.
Perhaps this will give us a fun game to play as we get to know each other. Yum, yum!
Monday, February 15, 2010
1885 Baby's Bib Crochet Pattern (a vintage reproduction) Part V ~ I'm Finished!

That may be the longest title for a blog post yet, but I'm elated to have finally completed this pattern! The 1885 Baby's Bib Pattern and now ready and available at Wind Rose Fiber Studio!
About a week ago, I had to take a break from this project because I kept coming up with small things I wanted to tweak in the design. I made bib after bib until I frankly couldn't take it anymore and had to walk away from my work for a few days. I was getting frustrated. Sometimes it's the designs that look so simple that can cause you the most trouble.
I don't want to scare you off. This bib really isn't hard to make. It was just a challenging pattern to write. If I were to rate the difficulty, I'd probably say intermediate, but that is only because there are armholes to be worked which require a good comfort level in pattern reading.

I'm also happy to be able to share an image of the original pattern today. I want to thank Iva Rose Vintage Reproductions for providing this first generation photograph with me!
Isn't it sweet? There are some styles that just take us back in time and this is one of them. Look at that ribbing and those bows. I find this pattern so charming!
Wednesday, February 3, 2010
Baby's Bib ~ A Vintage Reproduction From 1885 ~ Part IV

Back again with yet another bib picture. I actually am nearly done with this project. I just wanted to show you how the bib made up with the Debbie Bliss yarn I picked out.
I love the colors, but I've come full circle as far as yarn choice goes. What I plan to recommend for this project is Lion Brand Cotton. The Debbie Bliss is lovely, but I think it's too soft for a bib and probably will have trouble holding up under actual use. Lion Brand is a little thicker and less delicate looking, but I feel it's more equal to the task of being a bib.
There are hundreds of yarn brands out there. I know this, but again, I want to make my patterns using brands that people can pick up at a local chain. For this project, I want a natural fiber and one that is machine wash and dry. I'm going for practical here! Of course people will be free to choose their own favorite fibers. I was actually thinking of making this pattern up in ecru superwash merino and then hand painting it for my niece. It would be like a little piece of wearable art!
Tuesday, February 2, 2010
Baby's Bib ~ A Vintage Reproduction From 1885 ~ Part III

While I've been waiting on the cotton I plan to use for my last work through of this project, I decided to go ahead and put trim on my prototype. I have a facebook friend who said she had trouble visualizing how this could actually be a bib, so I've also taken some additional pictures.
I'm sad that I don't have any friends with one year olds, because that is about the size I'm going for. It would be nice to try it on a real baby, but I think the bib should work for children 1-3 years of age. The only thing that might limit the size is the armholes. After people make this pattern for the first time, it will be easy enough for them to add additional rows to the straps if they need larger openings for the arms.


Let me walk you through the pictures:
In the upper left, I have just untied the bows so you can see how they become the ties for the bib. I have changed the design of the original pattern from ornamental silk or satin shoulder ribbons to ones that have a more practical purpose. However, it would be quite easy to slip a length of ribbon under a couple of stitches at each shoulder and tie pretty bows. This could be quite sweet on a Christmas version or a special occasion bib.
In the upper right hand corner I have the ties tied as if the bib were being worn. The front would then show the scalloped edging around the neckline and the trim. I need you to use your imagination to fill in an adorable baby. For a moment I thought I might sketch one on the paper I'm using as a photo background, but I thought it might turn out a little creepy. *giggle*
In the lower left corner is what the back side looks like with the bib fastened. I think this picture in particular helps to illustrate the bib the best perhaps. You can see how it will tie and how the straps will wrap around.
The lower right hand corner is the front view again. It's basically a flat version of the tied bib.
I guess that's all for today. I now have some very pretty sport weight cotton from Debbie Bliss that I plan to use to make my final bib. It won't be long before I'll be able to add this pattern to my very small collection. (Right now it's a collection of one.) See you soon!
Wednesday, January 27, 2010
Yarn Selection and Playing with Skitch

I've been surfing around looking for a yarn that I think would work well for my vintage baby bib. I was going to choose from the yarns they carry at Michaels or Joann's, but I just couldn't do it. Joann's has a pretty large inventory, but the product reviews were telling.
I found myself at Webs. I'm sure most people who love yarn have found this online shop. Their prices aren't bad and they have all the choices you could ever want. I stumbled onto this new yarn by Debbie Bliss. It seems to fill all of my requirements.
It's a natural fiber, sport weight, machine washable yarn and a price that I think most people could afford. I want to make all of my patterns from reasonably priced yarn because I don't want anyone to look at a project and feel like it's out of their reach. Of course people can choose to work with whatever fiber they like, but I want the samples to be accessible.
Finally, I needed an excuse to play with Skitch, a new program my husband found for me. Nothing makes me happier than user friendly photo manipulation. Does that make me a geek?
Baby's Bib ~ A Vintage Reproduction From 1885 ~ Part II

I have to warn you right off the bat that this post may turn into a commercial yarn rant. I'm feeling frustrated in my work right now. One of my goals in rewriting these vintage patterns is to use readily available yarn. Not everyone has a nice yarn shop in their town or can afford to buy handspun. Most people do however have a Michaels or Joann's so that is where I'm going to source yarn for my projects.
I guess I'm becoming a yarn snob, because the choices, for the most part, are so unappealing. For this baby's bib I want to use a nice feeling yarn and one that is easy to machine wash and dry. I'm not a big fan of acrylic, so I guess I'm eliminating the vast majority of yarn with that one bias. I decided to go with Nature's Choice Organic Cotton by Lion Brand. I liked that it was 100% cotton and who doesn't prefer organic, but after making up my pattern with this yarn, I'm disappointed.
First of all, they're calling this a medium yarn, and I would put this more in a bulky category. Maybe I don't know what constitutes bulky in this novel world, but come on. This is thick stuff. I think what frustrated me is that it's kind of stiff and it had a negative effect on my shaping. I also think it lacks the delicacy that I need. I want to use yarn that is greater than lace weight, because I think people are more comfortable with heavier yarns, but I went too far with the organic cotton. I guess that's why I'm unhappy. I chose badly.
So maybe you can help me. I haven't spent much time with commercial yarn over the last few years. What is your favorite baby yarn? Do you care if it's acrylic or not? I've just been to Michaels so far, but our Joann's has a greater selection. I think this project would look best with a sport weight or lighter yarn. Bernat Baby? Suggestions?
Tuesday, January 26, 2010
Baby's Bib ~ A Vintage Reproduction From 1885

I'm a daily blogger so it bothers me when almost two days go by and I haven't written anything. The truth is that for the past few days, my lower back has been having a nervy spaz and has been making my normal activities challenging. I seem to be on the mend though and I'm ready to show you my latest endeavor.
I'm working on getting a first generation picture for you, but for now, I'll show you the beginning of my 1895 Baby's Bib. The project pictured here is not finished yet. There is still an edging that needs to be added. I think there is enough done for you to get an idea of the general look of the bib.
When I was picking out my next pattern to work on, this vintage baby's bib just kept attracting me. It's so sweet and only in 1895 would a bib be made from lace with scalloped trim. I also like it from a practical point of view. When my boys were little, I hated the bibs with hook and loop fasteners because I'd always forget to close them before washing and then I'd take the bibs out of the dryer to find them clinging to and damaging the fabric of other garments. The bibs that went right over the head were among my favorites, but if it was a particularly messy meal, you had to be mighty careful removing that bib. Of course there were those that snapped and tied and I guess that's the bib camp to which I belonged.
That's a lot of thinking about bibs isn't it? *giggle* Hey, this is important stuff for at least a couple of years! So I like this design because in addition to having a cool vintage appeal, it also provides nice coverage and is easy on and off. The original bib was made with silk bows on the shoulders, but I'm going to exchange them for crocheted bows that can double as ties. There are just too many kids out there who would happily pull off an untied bib. I also want the finished piece to be practical enough to throw into the washer and dryer; a consideration not had by most households in 1895.
Well that's what I've been up to while nursing my achy back. I'm sort of struggling with the right language to use to talk about these patterns I'm making. The verbs transcribe and reproduce don't always feel accurate. Although my goal is to have a finished product that looks as much like the original as possible, I find myself making so many changes as I rework these patterns. Maybe that's the word for it "rework". I'll figure it out.
Thursday, July 16, 2009
Featuring ~ All Things Belle!

Hello! I'm finally back from vacation and ready to settle into my fiber life! I can't think of a better way to return to my blogging than to introduce you this wonderful artist and her fantastic shop!
All Things Belle is an acquaintance of mine from Twitter. It's hard not to start to identify with her sweet avatar of a baby in one of her signature baby cocoons. One day she happened to throw out a tweet looking for a 100 yards of bulky weight yarn. I threw up a link to one of my handspun skeins and the rest is in the picture!

It is such a treat for me to get to see what my yarn was made into. Normally I just send fiber out into the world and hope people enjoy working with it. I want to thank All Things Belle for her generosity in sharing these beautiful pictures and giving me the permission to share them with you!
If you want to see more adorable babies looking ever so cute and content, All Things Belle is just waiting for your visit. You'll discover pinks and blues and lovely earth tones too! What a great gift idea for anyone who is expecting!

They must be comfortable. Just look at that yawn! These little bundlers are perfect for taking those first precious pictures of your new little one.
You are getting to see these photographs before they are even posted on the listing, but this CoZy wrap is available and waiting for a home.
While I'm at it, let me give a shout out to the incredible photographer behind these amazing pictures. You can see more of her work at Fairy tale Fotos By Shantel.
Monday, May 25, 2009
Happy Flower ~ My Sweet Amigurumi
Please allow me to introduce Happy Flower. Happy Flower is a character that began on paper. There was a time when my youngest didn't like to read very much. Being a young boy with impressive tenacity, he had determined that reading just was not for him. On the other hand, he was all about art and creativity. Always drawing and constructing, one day he made a life size mail box and taped it to the wall outside of his room. This gave his mother a great idea. This was the day Happy Flower was born.Happy flower began writing letters to the young man. Her letters were always exploding with feeling and fun. Happy Flower loved to laugh and play and was curious about so many things. She wanted to be the little boy's best friend and know everything about him.
This is how my son grew to love reading every day and writing too. Of course he had to answer all of Happy Flower's questions! In addition to her colorful writing, Happy Flower signed all of her letters with her name and a drawing of herself. She became a special character in our lives.
Recently I was organizing some of my son's art and there were the letters to and from Happy Flower. I have loved Amigurumi for a while now and have wanted to make one of my own. I decided Happy Flower would make a very cute Amigurumi.
I spent all day designing Happy Flower. So I am pleased as I can be to share pictures.


She really looks like my drawing come to life. I plan to make a couple for Wind Rose Boutique and I think she would make an awesome Spirit Jump, but this first one goes to my son.


She's a little self conscious about being bald in back, but I assured her that you are all very nice! Happy Flower has beans in her stem so she can stand all by herself. I also made the flower petals with some curl so that you can position them in different ways.

Oops, there's a gust of wind! Hold on Happy Flower!
Thank you for letting me share Happy Flower with you today and her story. Maybe she will inspire some other young readers and their moms. Sometimes a little creativity goes a long way!
Monday, November 24, 2008
Wind Rose Boutique - Another Brand New Store!
A couple days ago I shared my new Wind Rose Art Yarn shop with you, but I didn't stop there, I have another new store:


Wind Rose Boutique is where I keep all of my favorite handmade creations. Dividing up Wind Rose Fiber Studio has been a lot of work and at times a little confusing. I'm on the home stretch now and I can see the finish line! What makes me happy is that each shop has a clear and defined focus. They are easy to browse and find what you are interested in and for me it's easy to see the sections where my inventory might need a little boost. I think it's going to be great.
There are Etsy Minis and links on the sidebar for all of my new locations. The three shops also have links so you can easily jump from one to another. Come by for a visit sometime! See you tomorrow.
Sunday, October 19, 2008
Baby's First Christmas Pointy Hat (0-3 months)


This playful hat is the only one of it's kind at Wind Rose right now. I've been having fun with spirals lately and this baby hat reflects just that. It's a candy cane spiral from the pointy tip down to the white brim. The white yarn has a little bit of sparkle and I gave the brim a subtle, whimsical scallop, like a little holiday elf. The point of the hat is attached at a fanciful angle with a loopy pom pom at the point. This little hat looks cute coming and going!
Saturday, October 11, 2008
Spiral Baby Beanie - Free Pattern Follow up
I finally did it! At last The Baby Beanie pattern I've been talking about is posted here for you. It's one of those patterns that is really pretty easy to make, but kind of complicated to write down. It makes me crazy when I find errors in a pattern, so I get obsessed when I'm the writer. I made 5 of these hats while I was writing out the pattern. I also try to find a balance between being descriptive enough for everyone without being too verbose. So I hope I've succeeded, but if you ever find an error or confusing language in one of my patterns, please let me know.
You can see the look of this hat really changes with the colors you choose. There are so many possible color combinations. I like being able to see the spiral at the crown, but I have also made one with a pom pom on top and that was cute. Adding playful leaves and flowers would be so adorable on a little baby girl. When you think of it, the spiral is kind of like a long vine waiting for things to bloom on it. I think you can get really playful with this project. After you work through the pattern once, it will be easier to duplicate. You'll find yourself counting less and less. Before you know it, you'll have a stash of these in your gift closet, or if you're the mommy, your baby will have a super fun beanie collection!
I love pictures, so I wanted to post a few more. On the pattern I used a Candy Cane Spiral Beanie because the spiral pattern really pops with the contrasting colors. In general, the spiral will stand out more if you use two solid yarns, but I also like the look created when one yarn is solid and the other variegated. The Autumn Spiral Beanie shows this off. You can still see the pattern, but it's more subtle. And one more for old time's sake. I got the idea for this hat while making The Baby Cozy in our crochet-along. I had a lot of fun with that project. I'm still waiting on family baby news. Any day now...


You can see the look of this hat really changes with the colors you choose. There are so many possible color combinations. I like being able to see the spiral at the crown, but I have also made one with a pom pom on top and that was cute. Adding playful leaves and flowers would be so adorable on a little baby girl. When you think of it, the spiral is kind of like a long vine waiting for things to bloom on it. I think you can get really playful with this project. After you work through the pattern once, it will be easier to duplicate. You'll find yourself counting less and less. Before you know it, you'll have a stash of these in your gift closet, or if you're the mommy, your baby will have a super fun beanie collection!
Thursday, October 9, 2008
The Spiral Baby Beanie - Free Crochet Pattern for Infants 0-3 Months Old


Materials:
Crochet Hook Size H
Yarn - two colors of worsted weight yarn
Scissors and large eye needle
Note 1: yarn (A) will be the color with which you begin your beanie and yarn (B) will be the color that becomes the trim.
Note 2: This pattern is worked in the round
Stitches: You will be using the following stitches - chain stitch (ch), slip stitch (sl st), single crochet (sc) and changing colors. The DMC Stitch Guide is a useful reference. (∆) will symbolize changing colors throughout. I will use this symbol when you come to the last stitch of a color. You will start the stitch in the same color, but on the last yarn over, you will replace your yarn with the other color and pull up your loop. *Repeat instructions between asterisks* the number of times indicated.
Beginning at the Crown:
Begin with color (A). You want the center on the crown not to have a hole in the middle. Instead of chaining, begin by wrapping the tail end of your yarn, clockwise, from back to front around the index and middle fingers of the hand you do not hold your hook with. There should be 2 loops of yarn around your fingers. Insert your hook under the front loop and hook the back loop. Draw it under the front loop. Yarn over and pull through the loop on your hook. Pull the tail of your yarn to tighten the circle, but not all the way.
Row 1: (A) work 4 sc in the circle, sc in the circle (∆ B), sc in the circle (equals 6 sts) Pull the tail end of the yarn to close the beginning circle the rest of the way.
Row 2: 2 sc in next 3 sts, sc in next st, sc in same st (∆ A), 2 sc in next 2 sts. (equals 12 sts)
Row 3: *1 sc in next st, 2 sc in next st* 3 times, sc in next st (∆ B), 2 sc in next st, *1 sc in next st, 2 sc in next st* 2 times (equals 18 sts)
Row 4: *sc in next 2 sts, 2 sc in next st* 2 times, sc in next 2 sts, sc in next st (∆ A), sc in same st, *sc in next 2 sts, 2 sc in next st* 3 times. (equals 24 sts)
Row 5: *sc in next 3 sts, 2 sc in next st* 2 times, sc in next st, sc in next st (∆ B), sc in next st, 2 sc in next st, *sc in next 3 sts, 2 sc in next st* 3 times (equals 30 sts)
Row 6: *sc in next 4 sts, 2 sc in next st* 2 times, sc in next st (∆ A), sc in next 3 sts, 2 sc in next st, *sc in next 4 sts, 2 sc in next st* times. (equals 36 sts)
Row 7: *sc in next 5 sts, 2 sc in next st* 1 time, sc in next 5 sts, sc in next st (∆ B), sc in same st, *sc in next 5 sts, 2 sc in next st* 4 times. (equals 42 sts)
Row 8: *sc in next 6 sts, 2 sc in next st* 1 time, sc in next 4 sts, sc in next st (∆ A), sc in next st, 2 sc in next st, *sc in next 6 sts, 2 sc in next st* 4 times. (equals 48 sts)
Row 9: *sc in next 7 sts, 2 sc in next st* 1 time, sc in next 3 sts, sc in next st (∆ B), sc in next 3 sts, 2 sc in next st, *sc in next 7 sts, 2 sc in next st* 4 times. (equals 54 sts)
Row 10: sc in next 11 sts, sc in next st (∆ A), sc in next 42 sts. (equals 54 sts)
Row 11: *sc in next 8 sts, 2 sc in next st* 1 time, sc in next st, sc in next st (∆ B), sc in next 6 sts, 2 sc in next st, *sc in next 8 sts, 2 sc in next st* 4 times. (equals 60 sts)
Rows 12-21 (or to desired length minus 1 inch): sc in each st around. ∆ colors in second to last st of each opposing color row. For instance, in row 12 you begin crocheting in color (B). The sts you are working into are color (A). When there are only two color (A) sts left, sc in next st (∆ A) and then continue working around in (A). Follow the pattern in this way until you count 21 rows or reach your desired length minus 1 inch for the brim. (each row equals 60 sts throughout)
When you reach Row 21, you will be working in color (A), sc around as you have been. On the second to last st (∆ B), you can now cut color (A) leaving enough length to weave in the end.
Brim
Continuing in (B)
Rows 1-4: sc in each st around. (equals 60 sts)
Row 5: sc in next 59 sts, sl st in next st, ch 1 turn. (equals 60 sts)
Row 6: Skip first st (the sl st from previous row), sc in next 59 sts, sc in ch 1 space. (equals 60 sts)
Rows 7-10: sc in each st around. (equals 60 sts)
Finishing
Sl st into next st, finish off. Fold up last 5 rows to form brim. Discreetly weave in all loose ends.
Subscribe to:
Posts (Atom)


