Monday, April 18, 2011

The Sheep Drive

Saturday, April 16th, I had the opportunity to experience a piece of history. For over 100 years, bands of 2,000 sheep have walked the Heber-Reno Sheep Trail here in Arizona. The Dobson Sheep are the last two bands that make this 220 mile journey each year. Someday, perhaps in the not so distant future, this trail will see it's last herd and then this piece of Arizona's heritage will change forever. I could not pass up my chance to see a real sheep drive.


The sun was just coming over the mountains when I, along with my husband and two sons, arrived at the corner of Signal Butte and Brown roads in Mesa, Arizona. It was six in the morning and I was surprised to see that quite a few cars already lined the street corner. I knew that members from my spinning and weaving guild would be there, but I didn't expect so many others. It made me smile to see such a large group coming together to see the sheep.


We didn't know exactly when to expect the sheep. Our gathering continued to grow as the minutes ticked by. We milled about and gazed southward, impatient to see our woolly friends. Finally, off in the distance, we could make out the flashing lights of the police cars that were clearing the path ahead of the flock. Then, slowly at first, the band of sheep came into view. As they rounded the corner, with a sea of dust in their wake, we could begin to see just how many there were.


Before we knew it, they were upon us. The crowd cheered and the cameras went crazy as Felipe, the foreman, lead the sheep north. I was surprised by how quickly they moved. I knew it would not take long for them to pass. I alternated between trying to capture the moment with my camera and attempting to take everything in with all of my senses.

The motion of so many sheep trotting at once, the sound of their baaing and the smell of their general sheepiness was all around me. My kids, who a few moments earlier were getting tired of waiting, were now animated and calling things out to me. "Look at the black one! Did you get a picture of it?" The air seemed full of energy. It was exhilarating!


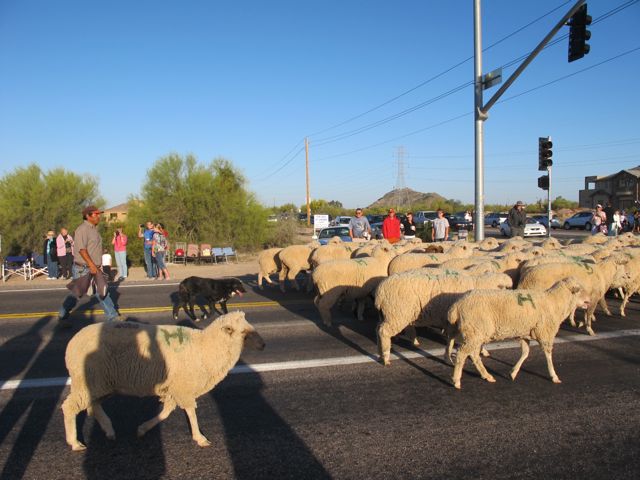


I don't know how long it took for the band to pass. It was just a few minutes and it went by so fast. I found myself wishing there were even more sheep so that the moment could last just a little longer. Some members of the crowd chased after the herd in the hopes of getting just one more picture or one more look, but the sheep disappeared into that cloud of dust made by so many hooves. Though we squinted and craned, we found ourselves just a group of people again.

It took me a few seconds to regain my focus. There were my kids, my husband, my friends. There were the smiles of the kindred folk with whom I had just shared this experience. There were the roads, Signal Butte and Brown, now filling with cars, car noises and car smells. If it were not for the adrenalin I still felt, it might have seemed unreal. I giggled as I walked to the car. What a wonderful way to start the day!

As for the sheep, they will continue north. Over the next 45 days they will travel into Usery Mountain Park, through Bulldog Canyon to the Salt River. From there they will cross the Blue Point Bridge and on towards Sugarloaf Mountain. They'll travel over Reno Pass and cross Tonto Creek heading on to the Sierra Anchas Mountains. They will proceed through Pleasant Valley and climb to the top of the Mogollon Rim and finally on to the Apache-Sitgreaves National Forest.

They will spend about six weeks in the cool mountains before they return home in October. This is all to avoid the soaring summer temperatures of southern Arizona, but the mild fall and winter will be the perfect climate for mother ewes to graze and to give birth to their young.

You can learn more about the story of the historic Heber-Reno Sheep Trail by reading Emily Walks the Sheep Trail by Cindy Shanks. In her book, Cindy gives a charming and educational account of this journey from the point of view of Emily, a young lamb. Emily will tell you all about life on the farm and her first trip up and down the trail.

Sunday, April 17, 2011

Tatted Charm Bracelet


I just finished this tatted charm bracelet. It's meant to be a little Easter gift for my mom who is coming to visit. Of course I probably just spoiled the surprise, but I'm hoping she's too busy packing to think about my blog today.

This is just my third charm bracelet. I started making these during my last vacation. I was on the plane and started to tat little shapes. The shapes made me think of charms, so I gave them stems and leaves so that I would have a loop by which to hang them. Finally, I designed a simple vine chain and my tatted charm bracelet was born.

For my mom I went with two shades of pink. She's likes pastels and I thought the two colors looked pretty together. When it's on her wrist, it will hang so that the light and dark pinks alternate. I used size 10 crochet cotton so they are dainty , but still showy enough. The charms measure just over half an inch at their widest point.

I also think it's interesting that my magic number turned out to be 8 for this project. When I'm designing anything, a number usually emerges. I end up calling this my "magic number" in my head which I guess is silly. It begins with a base number. Let's say I decide to make a flower with nine petals. Then I have the number 9 in my head. Thereafter, I'll find myself making everything for that project in either factors or multiples of nine. If I stray from my magic number, things start to look wrong. "You have to stick with the magic number!" I remind myself.

My magic numbers are almost always odd, but now that I think about it, I'm not surprised to have a even magic number for a tatting project. Especially when I'm making split rings that are even on both sides. I also kind of like that the number is 8. My mom was born on the 8th day of her birth month and her bracelet has 8 flower charms. It's seems only fitting that her magic number turned out to be 8.

Now that I have revealed some of the odd workings of my mind, I will run and hide. Actually, I need to go dye some sapphire blue Merino. Oh no, not hiding at all!

Saturday, April 16, 2011

Sheep!


The story of the sheep drive is coming! For now, I give you this photo. There are many more on the way!

Friday, April 15, 2011

Summer Cotton Crocheted Bracelet ~ Free Pattern!


I'm pleased to offer this new free pattern today. The Summer Cotton Crocheted Bracelet was inspired by a trip to Virgin Gorda. It's perfect for those casual, carefree days of summer when only the feel of cool cotton will do. This bracelet is so fun and easy to make. You'll want to design one for all of your friends!

This pattern will make a bracelet that is 7 inches long from one end of the clasp to the other. This is a medium size. At the end of the directions, I will discuss how to make the bracelet a little larger or smaller so that you can customize it to your needs. I will also suggest some fun variations to spark your imagination.


You will need:
Aunt Lydia's Crochet Cotton Size 3 (Natural)
32 Size 6/0 Glass Beads
Crochet Hook US D3/3.25 mm
Beading needle
Sewing needle
Scissors
Clasp (I'm using a lobster clasp with a closed ring)

Threading The Beads

Before you begin to crochet, use your beading needle to easily slip your beads onto the cotton thread. You may want to thread a few extra in case you need to increase the size of your bracelet or just so you don't have to worry about miscounting. It's fine to have too many beads, but you don't want to be a bead or two short. Slide your beads a couple feet down the thread and you are ready to begin.


Making The Bracelet


Begin with a slip knot on your hook leaving a 10" tail for sewing on clasp [picture 1]
Row 1: ch 2, sc in 2nd st from hook, ch 1 turn
Row 2: 2 sc in st, ch 1 turn
Row 3: 2 sc in each st, ch 1 turn (4 sts in row)
Row 4: sc across (4 sts) [picture 2]

Beaded Chain 1: ch 3, (slide a bead down close to your hook and ch 1, ch 3) 6 times for a total of 27 chs. Ch 3 more, turn, sc in 2nd st from hook and in next st (beginning of opposite end rows) [pictures 3 & 4]
Beaded Chain 2: ch 1,
(slide a bead down close to your hook and ch 1, ch 3) 6 times, slide a bead down close to your hook and ch 1, ch 1 for a total of 27 chains, sl st into same st as the beginning of Beaded Chain 1, sl st in the next st of row 4 [pictures 5 & 6]

*Note: While you should be careful not to twist your Beaded Chains, don't be overly concerned if some of the beads are facing in opposite directions. When the bracelet is done, you will be able to give it a little tug and manipulate the chains so that the beads are all facing up.

Beaded Chain 3:
ch 3, (slide a bead down close to your hook and ch 1, ch 3) 6 times for a total of 27 chs. sc into the last two sts (the opposite end rows created in Beaded Chain 1) ch 1 turn, sc in first two sts
Beaded Chain 4:
ch 1, (slide a bead down close to your hook and ch 1, ch 3) 6 times, slide a bead down close to your hook and ch 1, ch 1 for a total of 27 chains, sl st into next st of Row 4, sl st into final st of Row 4
Beaded Chain 5:
ch 3, (slide a bead down close to your hook and ch 1, ch 3) 6 times for a total of 27 chs. sc into the last two sts (the opposite end rows created in Beaded Chain 1) ch 1


Finishing

Working along the opposite end rows of your Beaded Chains [picture 7], sc dec two times, ch 1 turn, sc dec, ch 1 turn, sc, finish off leaving 10 inches for sewing on clasp. Use the beginning and ending tails of thread to sew on your clasp. Weave in loose ends.

Pattern Notes

1. When the bracelet is complete, I like to give it a gentle tug. Cotton has a little bit of give and this allows the beaded chains to even out and lay nice.

2. Sizing - The best way to adjust the size is to increase or decrease the Beaded Chains by 4. This adjustment measures just about 1/2 inch. For example, if you want to make a bracelet that is 8 inches long, you will add 8 ch sts to the Beaded Chains. Remember to account for the additional beads. If you desire a bracelet that is 6 1/2 inches long, then you will need to subtract 4 ch sts from the Beaded Chains.

3. After you have successfully completed your first Summer Cotton Crocheted Bracelet, you can have fun making up new variations on the pattern.

You could double the pattern for a cuff style bracelet.

If you'd rather not sew on a clasp, you could use the tail ends to simply tie on your bracelet. For a sturdier tie, you could begin and end your bracelet with chains long enough to tie and untie.

You could also make up this pattern with metal wire or handspun yarn.

You could use one bead for every stitch of the Beaded Chains for a striking bangles or
you could substitute the beads for charms. You may decide to use no beads at all for a more laid-back look.

I hope you enjoy making this pattern your own!

Related Posts:
Summer Cotton Crocheted Bracelet
Summer Cotton Crocheted Bracelet ~ The Pattern is Coming!

Here's a handy list of knit and crochet abbreviations provided by Lion Brand.

Thursday, April 14, 2011

Summer Cotton Crocheted Bracelet ~ The Pattern is Coming!


Phew, it feels good to get all that dyeing done, but my husband tells me that I have too much fiber on my blog lately. Now how can a fiber blog have too much fiber???

Seriously though, point well taken. I do have a variety of interests and I like to offer a little diversity here at Wind Rose. A few days ago I asked if anyone would like me to write up the pattern for my Summer Cotton Crocheted Bracelet and a few of you said, "yes", so that's what I'm going to do!

I just made up this new one so I could think about how I'll write the pattern. The first one had amber beads and this time I chose water colors. I also took my pictures inside for a little more light control. In this photo at the top of the post, I splayed the chains so you can see how they take on the appearance of five bangles.


I took a couple more poses just to show the bracelet at all angles. The twisty picture makes me happy. Anyway, before I digress, The pattern is coming. I had a guild meeting yesterday and an art class today, so tomorrow is the earliest I can get started. I just wanted to assure you that I will write this pattern and it's coming very soon!

One final thought today, also in the interest of blog variety, I'm planning on attending (at least for a short distance) a sheep drive on Saturday morning. I've never seen 2000 head of sheep on the move, so this should be pretty cool. I was actually wavering on whether or not to go, but I don't think I should let the opportunity pass. I'm announcing this on my blog because if I write that I'm going, then I know that I'll actually get up in the 4:00 hour, early Saturday morning and go. I need a little motivation to get up that early!

My Merino Color Chart!


Pdlrrrrrrrrrr........ (that's my drum roll)


Here it is! My Merino Color Chart. Here are the 40 colors of Merino that I keep in stock at Wind Rose Fiber Studio!!!

This has been my goal since January. Every year I make resolutions for improvements to my shop and this year my plan has been to have a large, staple inventory of Merino colors. These are the colors you can count on finding when you visit Wind Rose!

Of course now the challenge changes from getting them all in stock to keeping them all in stock. I guess I'm about to find out if I can maintain an inventory this size. I'm just one dyer, but I'm pretty determined!

PS ~ If you click on the image, you should be able to view a larger picture of the chart. :D

The Purples & The Earth Tones ~ Merino Roving


Here are my last two color families. I don't dye six shades of purple so the grays and black joined that group. All together, starting at twelve o'clock and going clockwise: Violet, Lilac, Periwinkle, Silver, Cinder and Jet Black.

Finally, I give you the earth tones presented in the same order: Golden Brown, Mediterranean, Sun Touched, Nutty, Sandy Beach and Porcelain Fair. Some of these earth tones are from my skin tone line, but I should point out that my Skin Tone Samplers offer even a few more shades with which to create.

I'm actually out of stock of my Skin Tone Samplers right now or I'd share a link. Now that I have all of my 40 shades of Merino finished, I can start dyeing my samplers again. The first sampler will be my Firestar Sampler as I have had a special request and then I'll get working on those skin tones!

Wednesday, April 13, 2011

The Blues ~ Merino Roving


I'm trying to get all of my color collages completed today, so I'm back with the blues. The blues and the greens definitely have some overlap as I have included the teals and the aquas here with my blue family.

So, once again, starting at twelve o'clock and going clockwise: Night Blue, Light Blue, Teal, Turquoise, Sapphire and Soft Aqua.

I've started work on my Merino Color Chart and it's looking really nice. It's going to be great to be able to offer such a visual of my work!

The Greens ~ Merino Roving


Good Morning. Today I bring you the greens. These are all the shades of green that I keep in stock at Wind Rose Fiber Studio.

Starting at twelve o'clock and working clockwise, there's Bottle Green, Chartreuse, Grass Green, Happy Green, Emerald and Spruce.

I should also share that I also refer to Grass Green as Merry Green during the Holidays. Of all my greens, it's the one that I see as the most merry.

Tuesday, April 12, 2011

The Yellows ~ Merino Roving


I'm in the process of posting all of my Merino Colors here on my blog. I don't mean to be drawing it out so long. I just have so many things I'm always trying to do.

I think it's fun to see each color family this way. When I'm done, I'll probably arrange them together in one final post. I think it will be nice to have a reference to all of the colors in one place.

Starting at twelve o'clock and going clockwise, the yellows include: Bright Yellow, Baby Chick, Golden Ochre, Moon Yellow and Butternut.

Sunday, April 10, 2011

Summer Cotton Crocheted Bracelet


The first thing I did this morning was go into my studio and crochet this bracelet. I've had this design in my head since my vacation to Virgin Gorda a few weeks ago. While I was on the island, I saw a bracelet in a little beach shop that was simple, but cute. I took a couple mental notes because I knew right away that I wanted to come home and put my own spin on it.

Ever since I was a teenager, I have loved what I think of as summer jewelry. You know, those great hemp and cotton bracelets or necklaces that you tie on and just wear until they fall apart. Whether they're knotted or braided, plain or beaded, they just seem to be a part of the summer season. I used to gauge how tan I was by shifting my bracelet and seeing how fair my skin remained beneath.


The bracelet I saw in Virgin Gorda was actually leather with plain leather straps made to look like a group of bangles. I do love that bangle look, but what really caught my eye was that each end was crocheted. Now I have to admit that there was a time when I probably would have had some difficulty figuring out how to make this bracelet especially in one continuous piece. Now, having made and designed Miser's Purses, I knew almost without thinking how I could create a multiple chained bracelet in one unbroken piece. Maybe it's silly, but I have this thing about having as few knots or joins as possible in anything I make. I just think it improves the integrity and strength of the finished product.

In the end, its just a simple cotton bracelet. It could be made in all sorts of colors. It could have charms instead of beads or no beads at all. It's the kind of piece that's fun to make because you can change it up a little every time. I think I will always love wearing unassuming pieces of jewelry like this and I know they will always make me think of summer.


I'm thinking of writing this pattern up to share here on my blog. As pattern writing is always a bit of work, I like to check first to see if anyone out there is interested. So if you would like me to write this pattern, leave a comment on this post. I don't need a lot of encouragement. Just a little. :D

Friday, April 8, 2011

Rust Merino in the Works


Good morning! Here's the rust color I was talking about yesterday. I still need to tweak it just a little, but I think I have a good recipe now.

It's a pretty color don't you think? It will be a nice addition to my oranges. It does seem like an essential fall color. It's also a color that you often see in the landscape here in the southwest.

I'm excited about this new shade. I have a customer to thank for it actually. I've been developing this rust for an artist who makes the most adorable little felt animals. You can see her work at the Morning Glory Workshop on Etsy.